From the Ground Up: What a Professional Paver Installation Actually Looks Like, Day by Day
You said yes. The contract is signed, the date is on the calendar, and the crew is scheduled to arrive Monday morning. And now, in the quiet of Sunday evening, you are standing at the kitchen window looking at the patio you are about to tear up, and the question that surfaces is the one nobody answered during the sales process: what actually happens this week?
The paver installation process, when done professionally, follows a sequence that is both more methodical and less disruptive than most homeowners expect. It is not a demolition. It is not chaos. It is a controlled, engineered transformation that moves through distinct phases, each building on the last, each producing a visible and measurable result. And by the end of the process, the surface you have been walking on for years will be replaced by something that feels, functions, and looks fundamentally different.
This is the day-by-day walkthrough. Not the brochure version. The real one; what happens, why it happens, and what you will see from the kitchen window at each stage.
Explore the complete outdoor living ecosystem at NextGen Screens
The Question Every Homeowner Asks After Saying Yes
How long does paver installation take? The honest answer is three to seven days for a typical residential patio, depending on the size of the installation, the complexity of the pattern, the condition of the existing surface, and whether the project includes demo of an existing concrete slab. Driveway installations tend toward the longer end. Walkways and smaller patios can be completed in two to three days.
But the timeline is less important than understanding what fills it. Each day of the paver project timeline has a purpose, and the homeowner who understands that purpose will feel less anxiety about the process and more confidence in the result.
How to prepare your yard for paver installation begins before the crew arrives. Clear the work area of furniture, potted plants, grills, and any items that will need to be relocated. Ensure the crew has access to the area without obstructing your daily routine as much as possible. If the project involves removing an existing concrete slab, expect some noise and vibration during the demolition phase. And communicate with your neighbors; a brief heads-up that construction will be happening for a few days goes a long way toward maintaining good relationships.
The crew arrives with equipment, materials, and a plan. What happens next is more precise than you might expect.
Discover how paver surfaces support motorized screen systems at Onetrack Screens
Day One: Site Assessment and the Plan You Can See
What happens during a professional paver installation begins before the first shovel touches the ground. The crew lead walks the entire project area, confirming the layout against the design plan, verifying grade and drainage paths, marking utility lines, and identifying any site conditions that differ from what was documented during the estimate visit.
Stakes and string lines are set to define the exact boundaries of the installation. Elevation points are established to ensure the finished surface meets the specified drainage grade. If the project involves removing an existing concrete surface, that demolition typically happens on day one, with the debris removed by truck before the base preparation begins.
By the end of day one, the homeowner sees the project area stripped to subgrade; raw earth, exposed and graded, with the boundaries of the new surface clearly marked. It does not look like progress. It looks like a construction zone. This is normal. The transformation begins below the surface, and the below-surface work is what determines whether the above-surface result lasts five years or twenty-five.
Learn about engineered outdoor protection at Maxforce Screens
Excavation, Base Prep, and the Work That Disappears Under the Surface
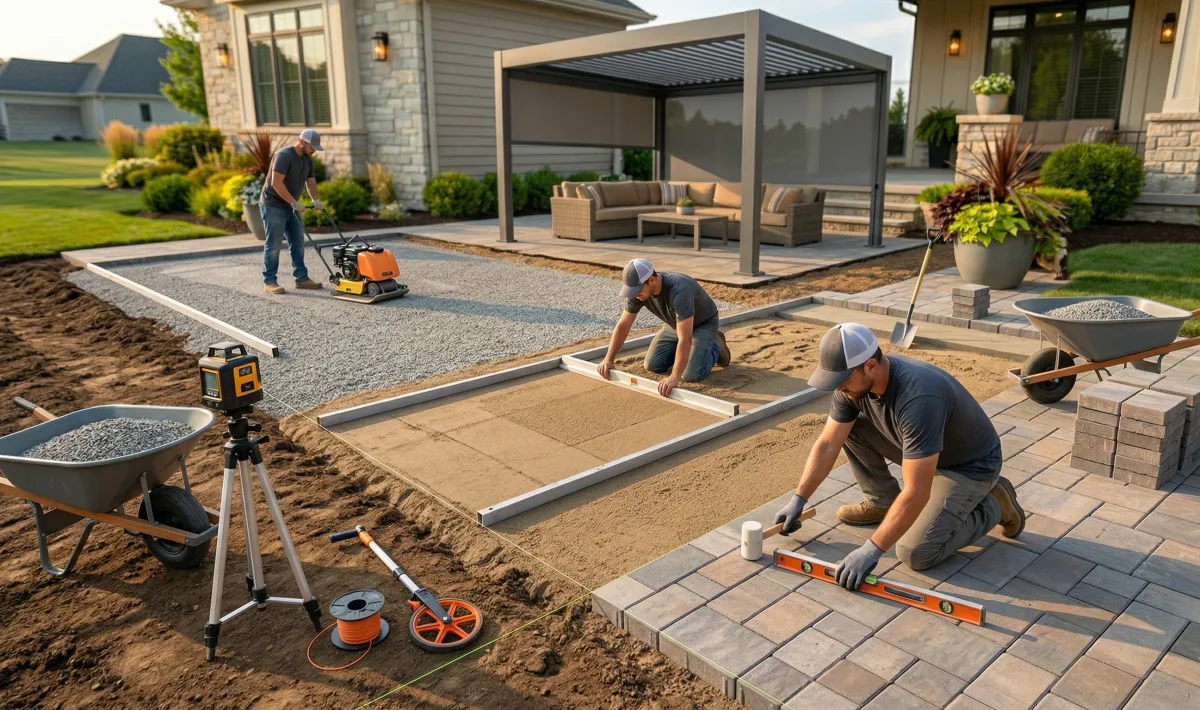
Day two and, for larger projects, day three are dedicated to the work that is invisible once the pavers are laid but is the most critical phase of the entire paver installation process. The excavation establishes the depth required for the gravel base, the sand leveling layer, and the pavers themselves, typically eight to twelve inches below the finished surface grade.
Into this excavation goes the aggregate base material, typically crushed gravel or recycled concrete, installed in lifts of two to three inches and compacted with a plate compactor after each lift. The compaction is not a single pass across the surface. It is a systematic, layered process that eliminates air pockets and creates a base with the load-bearing capacity to support not just foot traffic, but the weight of outdoor furniture, the point load of pergola post footings, and the occasional vehicle if the installation is a driveway.
The base is graded to the drainage specification established on day one. A minimum slope of one percent, directed away from the home's foundation, is maintained through the entire base layer. This grading work is invisible once the pavers are set, but it is the engineering that prevents water from pooling, saturating, and undermining the installation over time.
By the end of the base preparation phase, the homeowner sees a compacted gravel surface that looks oddly finished for something that will be completely hidden. This is the floor beneath the floor. And it is the foundation that everything above it depends on.
See the complete outdoor living system at NextGen Screens
Laying the Pattern: Where Engineering Meets Design
The sand layer goes down next; one inch of coarse bedding sand, screeded to a precise level using guide rails and a straightedge. This leveling process is exacting because the sand bed determines the final surface grade. Every high point and low point in the sand bed will be replicated in the finished paver surface.
Then the pavers are set. This is the phase homeowners find most satisfying to watch, because it is where the design vision becomes tangible. The crew works from one corner of the installation outward, placing each paver by hand or with suction grips, maintaining consistent joint spacing, and following the pattern specified in the design plan.
Herringbone patterns are the most labor-intensive and the most structurally sound, because the forty-five-degree or ninety-degree interlock creates a surface where no single paver can shift independently. Running bond patterns move faster and create a clean visual line. Basketweave and cobblestone patterns fall somewhere in between. The choice of pattern affects both the aesthetic and the structural performance of the finished surface, which is why the pattern decision should be made during the design phase and not improvised during installation.
Cuts are made at the edges where full pavers do not fit the boundary. A wet saw produces clean, precise cuts without the dust and imprecision of dry cutting. The quality of the edge cuts is one of the most visible indicators of a professional installation versus an amateur one; clean, tight edges signal competence, while rough, gapped edges signal haste.
By the end of the paver-laying phase, the homeowner sees the surface they chose. The color, the pattern, the texture. It is the first moment where the project looks like the vision. But it is not finished yet.
Explore the resource library for outdoor living at Onetrack Screens
Joint Sand, Sealing, and the Details That Finalize the Job
The pavers are laid. The pattern is complete. The surface looks beautiful. And the temptation, for both homeowner and contractor, is to call it done. But the two final steps are what differentiate a professional paver installation from an amateur one, and skipping either of them will cost the homeowner significantly in maintenance and longevity.
Polymeric sand is swept into the joints between every paver, filling the gaps completely. The surface is then compacted with a plate compactor fitted with a protective pad, which drives the pavers into the sand bed and settles the polymeric sand deep into the joints. Water is then applied to activate the polymeric binding agent, which hardens the joint material into a firm, flexible seal that resists weed growth, insect infiltration, and rain washout.
Sealing is the optional but strongly recommended final step. A penetrating or topical sealer applied to the finished surface enhances the paver color, adds a subtle sheen, provides UV protection, and creates a barrier against stain absorption. Sealed pavers are easier to clean, more resistant to efflorescence, and maintain their visual appeal longer than unsealed installations.
The edge restraints, installed during the laying phase and anchored to the compacted base with landscape spikes, are the final structural detail. They border the entire perimeter of the installation, preventing lateral spreading and maintaining the interlock pattern over time.
By the end of this phase, the project is complete. The surface is set, sealed, and ready for use.
Discover hurricane-rated outdoor solutions at Maxforce Screens
Walking on Your New Surface: The Moment the Project Becomes Yours
There is a moment, usually within an hour of the crew driving away, when the homeowner steps onto the finished surface for the first time. It is a small moment. Nobody takes a photograph of it. But it is the moment where the project stops being a construction zone and starts being a part of the home.
The surface feels different underfoot. Level, firm, intentional. The color catches the light differently at different times of day. The pattern creates a visual rhythm that the flat gray slab never had. The edges are clean. The joints are tight. The drainage works; you can tell because the surface is dry where water used to pool. And the patio, the driveway, the walkway, whatever the installation covers, no longer feels like something the house came with. It feels like something you chose.
This is the surface that a pergola will anchor to. This is the floor that motorized screens will seal against. This is the foundation of the outdoor room you have been imagining; the room with a floor, a ceiling, walls, and a view. The paver installation is the first layer of that room, and walking on it for the first time is the moment the vision starts feeling real.
What to expect paver installation day by day is straightforward: demolition and excavation, base preparation and compaction, sand leveling and paver setting, joint filling and sealing. Four to seven days of controlled, sequential, purposeful work. And at the end of it, a surface that will serve as the foundation of your outdoor living space for decades.
If you are ready to take the first step, or if you simply want to understand what the process looks like for your specific property, the resources are waiting.
Start exploring the complete outdoor living ecosystem at NextGen Screens
Discover Onetrack's motorized screen systems at Onetrack Screens
Learn about hurricane-rated protection with Maxforce Screens
